Last Updated on by Mitch Rezman
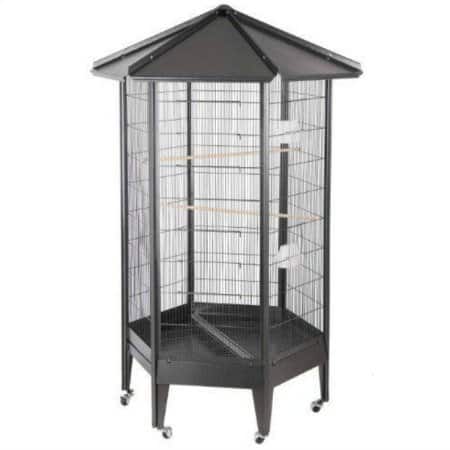
HQ 61818 Hexagon Indoor Bird Cage Aviary Assembly Instructions
Approximate Assembly Time: 1 Hour – 1.5 Hours
Tools Needed: Flat head screwdriver, pliers
It is recommended that you complete this part of the assembly outside. You will need to be in space higher than normal ceiling height to make cage base construction easier.
1 Stand up two side panels – make sure the doors are facing out. There are two panels with open slots on the bottom to facilitate access to the pull out trays and grills. Those two panels need to be side by side.
2 Slide long slide bars down to connect two side panels
3Continue this procedure all the way around, but do not connect the last slide bar
4 Run galvanized bar, finished side up (this is not referring to the smooth side, but the side with the extra strip) across the cage where one end fits between the two side panels with the pullout slots. This bar must be flush with the top lip that runs around the lower portion of the cage as this is where the pull out grills will rest. It is critical that this part is properly assembled and that when finished the gap around the trays is ½ inch or less. If the gap is any larger than that, sugar gliders would be able to escape.
5 Place galvanized pan sharp side down over the bottom lip of the galvanized bar.
6 Install second galvanized pan
7 Install the final slide bar so cage base construction is now complete
It is recommended that you complete the final stages of assembly inside as the roof width may be too large to fit through most doors.
8 Slide the trays into pan slots … Slide the grill over the trays to rest on the grill holders on the side panels of the cage and the resting on top of the galvanized bar. When this part is assembled properly there will be very little space creating a secure environment for your critters in their new home.
9 To begin roof assembly, connect 2 pieces of roof as shown in enclosed exploded view picture
10 Fasten the top holes with supplied hardware (nut and bolt) . Hand tighten only
11 Attach all pieces of the roof. After the roof is completely assembled, tighten all bolts.
12 Attach the top finishing piece to cover the hole on top of the roof.
13 Place roof on top of cage. Use supplied hardware (nut, bolt, two washers) to connect the roof by going through the lower hole and the roof line and going through the holed tab on the cage base.
14 Tighten all screws with screwdriver after roof is completely connected.
15 Install casters.
Security Check provided by a customer:
Once assembly is completed, check all the doors and make sure that they fasten securely. The large doors slide down to lock into place and if properly closed are inescapable by sugar gliders.
The smaller doors slide up and down. We’ve included two cable ties to keep these doors permanently shut as we’ve found we don’t use them much with our deluxe cage. Of course, other types of clip may be used, but we do suggest you lock these doors down in some manner
Another safety suggestion we would like to offer concerns the openings on the bottom of the cage where the trays pull out. Flaps cover these openings. We’ve included four magnets (two for each door) to keep the flaps shut tight. Arnold has managed to get his flap open to visit with me in the middle of the night and since we started using magnets, Arnold can no longer visit unless invited!
Author Profile
Latest entries
 The Traveling BirdJune 26, 2025Can You Name 5 Parrot Species That Are Living Wild in the USA?
 Bird BehaviorJune 26, 2025How is it Parrots Are Problem Solvers Social Animals and Even Use Tools?
 Bird & Parrot AnatomyJune 25, 2025How a Tiny Chemical Modification Makes Parrots Nature’s Living Paintings
 PigeonsJune 20, 2025How Do Parrots Thrive in Cities Outside Their Native Habitats?